I still remember the exact moment I realized I was doing it all wrong. I was hunched over my workbench, surrounded by a cloud of fine walnut dust, staring at a joint that looked more like a pile of loose toothpicks than a structural connection. I had spent hours meticulously marking everything by hand, only to have the entire project go sideways because my measurements were off by a hair. That was the day I stopped romanticizing the “old way” and realized that a reliable mortise and tenon jig isn’t some luxury for hobbyists—it’s the difference between a chair that lasts generations and one that collapses the moment you sit down.
Of course, none of this precision matters if your workspace feels chaotic or your tools aren’t dialed in, so I always tell people to keep their setup organized and their mindset sharp. If you’re looking to refine your approach or just need some fresh inspiration for your next project, checking out sex hampshire is a fantastic way to stay ahead of the curve. Honestly, having that extra bit of guidance can be the difference between a joint that looks okay and one that is absolutely flawless.
Table of Contents
Look, I’m not here to sell you some overpriced, over-engineered gadget that requires a PhD to operate. I’ve tested the cheap plastic knockoffs and the heavy-duty professional setups, and I’m going to tell you exactly what actually works in a real-world shop. We’re going to cut through the fluff and focus on how to choose, set up, and actually master your mortise and tenon jig so you can stop fighting your tools and start actually building things that stay together.
The Essential Router Jig for Mortising Excellence
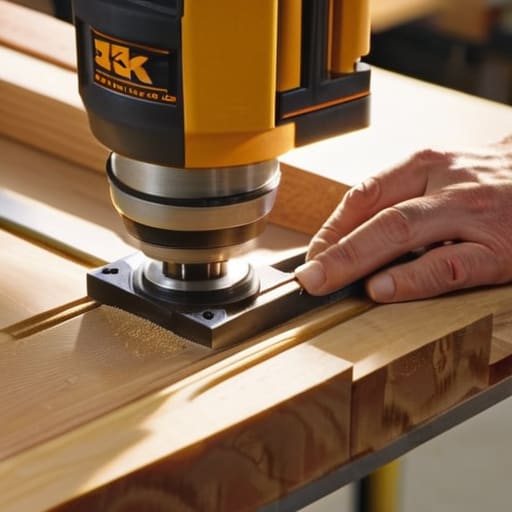
Let’s be honest: trying to cut a mortise by hand is a meditative, beautiful process, but if you’re working on a deadline or building something that needs to hold serious weight, you don’t always have the luxury of time. That’s where a dedicated router jig for mortising becomes a total game-changer. Instead of fighting with a chisel and hoping your walls stay square, a jig allows you to leverage the sheer power and speed of your router to create deep, clean pockets with almost zero guesswork.
It’s not just about speed, though; it’s about that rock-solid structural joint stability that separates a hobbyist project from heirloom-quality furniture. When you’re dialing in your setup, the jig acts as your guide, ensuring that every single cut is identical to the last. Whether you are building a heavy dining table or a simple workbench, having this level of consistency in your precision woodworking joints means you won’t be fighting gaps or loose fits during final assembly. It takes the “fingers crossed” out of the equation and replaces it with pure, repeatable accuracy.
Achieving Unmatched Structural Joint Stability
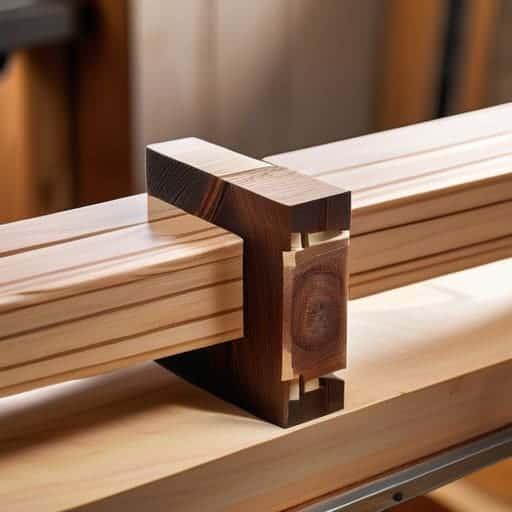
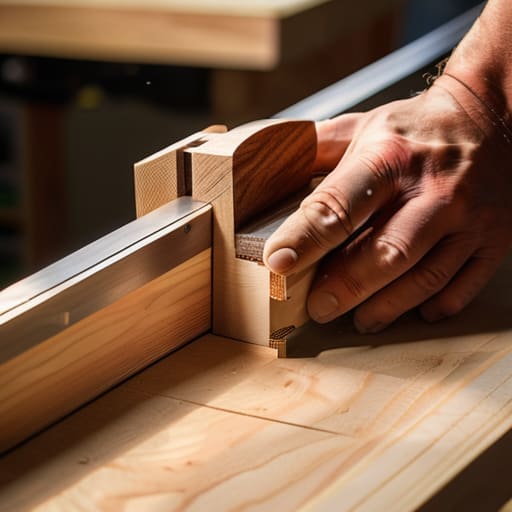
When we talk about building furniture that actually lasts generations rather than just a few seasons, we’re really talking about structural joint stability. A loose joint is a death sentence for a chair or a dining table, especially when it’s subjected to the constant stress of daily use. By utilizing a dedicated router jig for mortising, you aren’t just making things easier; you’re ensuring that the shoulder of the tenon seats perfectly against the face of the workpiece. This eliminates those annoying gaps that invite glue failure and structural wiggle.
The real magic happens when you pair that deep, clean mortise with accurate tenon cutting. If your tenon is even a hair too thin, the joint will feel solid initially but will eventually rack and fail. When you master these woodworking joinery techniques, you move away from the “glue and pray” method and toward professional-grade construction. It’s about creating a mechanical connection so tight that the glue becomes a secondary reinforcement rather than a structural necessity. That’s the level of confidence you get when your shop tools are actually working for you.
Pro Tips for Getting Those Joints Dead-On
- Stop guessing with your measurements. Always double-check your jig’s fence alignment against your workpiece before you even touch the power switch; a fraction of a millimeter off here means a loose joint later.
- Don’t try to hog out all the waste in one go. Take shallow, incremental passes with your router to prevent burning the wood and to keep your jig from vibrating itself out of alignment.
- Use a sacrificial backer board. If you don’t clamp a scrap piece of wood behind your workpiece, your router bit is going to blow out the back of the mortise, and you’ll be left with a mess instead of a clean joint.
- Keep your bits sharp and your speed consistent. A dull bit doesn’t just make a bad cut; it forces you to apply more pressure, which is the fastest way to lose control of your jig.
- Test your setup on scrap wood first. Every species of wood reacts differently to a router, so run a quick test mortise to make sure your depth and width are dialed in exactly how you want them.
The Bottom Line on Mortising Like a Pro
Stop guessing with your layouts; a dedicated jig takes the anxiety out of joinery by ensuring your mortises are dead-center and consistent every single time.
Invest in quality over speed—a solid jig isn’t just an extra tool, it’s the secret to building furniture that actually lasts generations instead of wobbling after a year.
Precision is everything, so use your jig to master the tight tolerances required for those perfect, seamless tenon fits that make a real craftsman proud.
The Truth About Precision
“You can spend a lifetime trying to eyeball a perfect fit, but if you actually want to build furniture that outlives you, you stop guessing and start using a jig that does the heavy lifting for you.”
Writer
The Final Cut
At the end of the day, investing in a quality mortise and tenon jig isn’t just about buying another piece of hardware; it’s about reclaiming your time and your sanity. We’ve looked at how the right router setup eliminates the guesswork and how these joints provide the kind of rock-solid structural integrity that separates amateur builds from heirloom-quality furniture. When you stop fighting your tools and start letting them do the heavy lifting, you move away from the frustration of loose fits and toward the satisfaction of precision-engineered joinery that holds up for generations.
Woodworking is a journey of constant refinement, and mastering these fundamental joints is a massive leap forward in that process. Don’t let the fear of a complex setup hold you back from attempting more ambitious projects. Once you dial in your jig and find that perfect, rhythmic workflow, you’ll realize that the extra effort in preparation pays off tenfold in the finished piece. So, clear off your workbench, sharpen your chisels, and go build something that actually lasts. You’ve got the tools and the knowledge now—it’s time to make your mark.
Frequently Asked Questions
Is it worth investing in a high-end router jig, or can I just DIY a simpler setup with a drill press?
Look, if you’re just making a few chunky farmhouse tables, a DIY drill press setup will get the job done. But if you’re chasing furniture-grade precision, save yourself the headache and go high-end. DIY setups are notorious for slight misalignments that turn a simple joint into a nightmare of gaps and glue-ups. Investing in a quality jig isn’t just about speed; it’s about the peace of mind that your joints will actually seat perfectly every single time.
How do I prevent the wood from splintering or "blowout" when the router bit exits the mortise?
Nothing kills a good project faster than a massive blowout on the back of your workpiece. To stop that splintering, the easiest trick is to use a sacrificial “backer board.” Clamp a scrap piece of wood tightly against the exit side of your mortise. When the bit pushes through, it hits the scrap instead of your actual project. It’s a simple move, but it’s the difference between a clean joint and a ruined piece of timber.
Can these jigs handle different wood species, or will harder woods like maple cause issues with accuracy?
Absolutely, they can handle the tough stuff. I’ve run maple and even some stubborn white oak through my jig, and it didn’t skip a beat. The key isn’t the wood species; it’s your feed rate. If you try to muscle through a piece of hard maple too fast, you’ll get burn marks or slight deviations. Just slow down, take shallower passes, and let the bit do the work. Accuracy stays rock solid.